/ Automation / Rules
Content
- General Description of the Section
- How to add a rule?
- Key Elements of the Section
- How many times can an action be executed for one contact?
- Done
- How to edit the already created rule?
- How to disable a rule?
- How to delete a rule?
General description of the section
An automatic rule sets an action that works if a contact performs one of the conditions (triggers and events).
For example, if a contact pays for a product from the rule settings, then the contact is assigned a “VIP” tag, and the contact is added to “VIP” client list.
How to add a rule?
Go to “Tasks” – “Automatic rules” to set a rule and create a new rule.

To add a rule, click “Add rule”. A page with settings will spring up.

Rule name
Enter a name that you can easily understand. This name will never be seen by the clients and subscribers.
+ Add trigger
A trigger is an event that happens for contact. If an event occurs, the trigger executes the associated actions.
What could serve as a trigger?
Events follow “OR” logic. For example, the contact OR subscribes to the list OR creates an order — any mentioned event (including any of their combinations).
Here is a list of the available events which trigger the action.
- Added to list
- Removed from list
- Tag applied
- Tag removed
- Activated subscription
- Created order
- Paid order
- Refund by order
- New leads
- Start lesson
- Got access to the lesson
- Custom field value changed – allows you to perform an action if the value of the additional contact field has changed
Here are a few examples that demonstrate the capabilities of a trigger.
Example 1. Segmentation by gender (in the example, a field with the “switch” type is used).
Option 1.
You are doing active fitness newsletters. With this rule, you can separate women’s fitness from men’s and place women and men in separate groups. In the example from the screenshot below, a girl fills out a form and selects the “Female” gender, automatically falling into the “Women” group (implemented using the action).
Option 2.
Suppose you are engaged in active fitness newsletters. Thanks to this rule, you will be able to segment your base and make mailings to the target audience, sharing exercises for men and women. In the example from the screenshot below, a girl fills out a form and selects the “Female” gender, automatically falling into the “Women” group (implemented using the action).

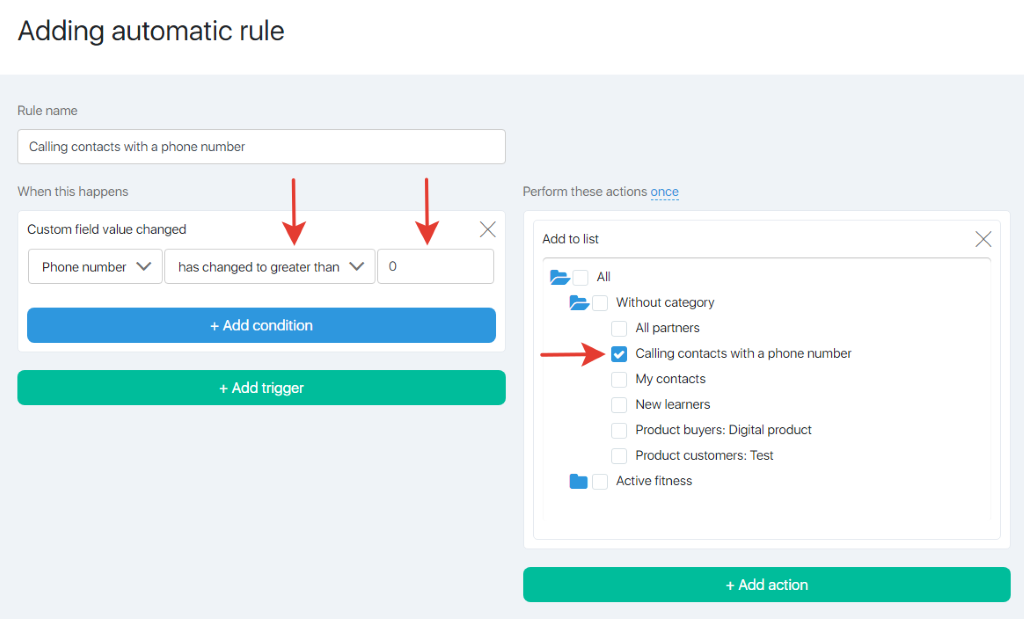
Example 2. Highlight contacts with a phone number.
The screenshot below shows how to configure the automatic addition to the group of contacts that gave you the phone number. This audience is usually warmer and calling them is easy and enjoyable.
+ Add action
Action is what happens with the contact once the trigger runs. If the trigger runs, then the contact can execute one of the following actions:
- Add to list
- Remove from list
- To tag
- Remove tag
- Set custom field
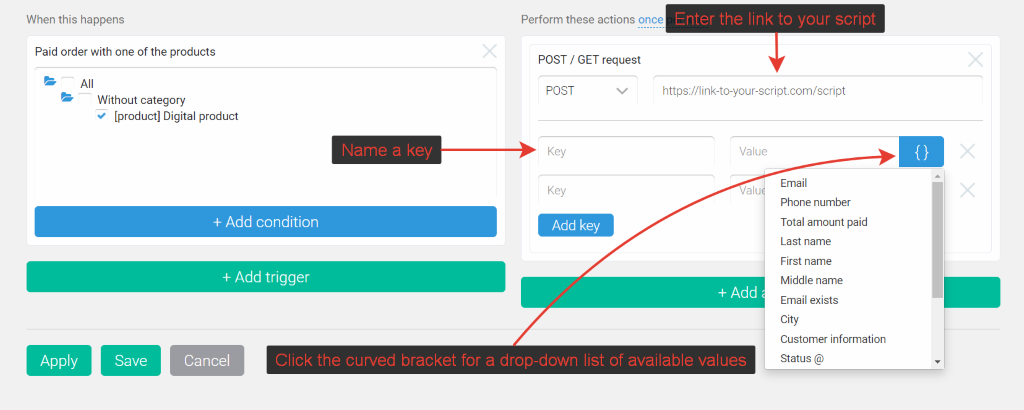
- POST/GET request sends the request via API to a third service or to your own script once the trigger runs. A list of the available transmitted parameters is called by clicking the curved brackets
A link to the script-processor must be securely connected (https)
For analytics purposes, if a contact is added to the list by a rule, then this list will not contain any previous promo tags. If the contact then generates order or subscribes to another list, then the promo tags will definitely appear.
Thus, these functions do not transform the records and the run of the promotional campaigns and partner programs. On the contrary, the subscription lists will display only the actual channels which bring the contact. It will be shown as follows:

Key elements of the section
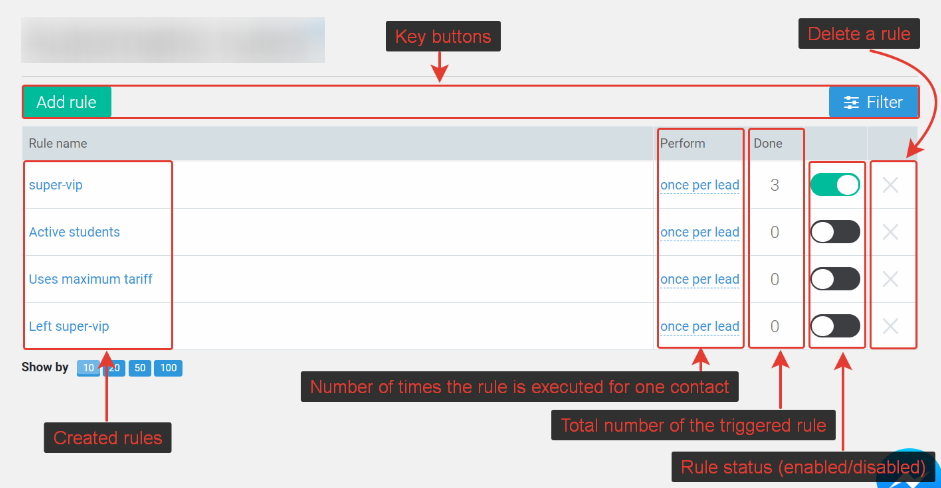
The main subsection page has “Filter” and “Add rule” buttons. The main part of the window displays a list of the created rules, their trigger number, enable and disable button, and delete button.
How many times can an action be executed for one contact?
An action could be executed only once or any (indefinite) number of times.
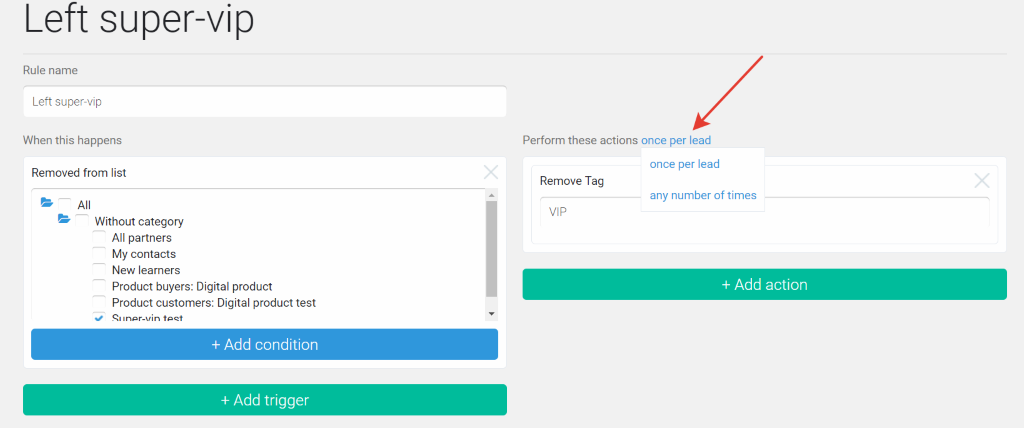
Let’s look at the examples:
Any number of times
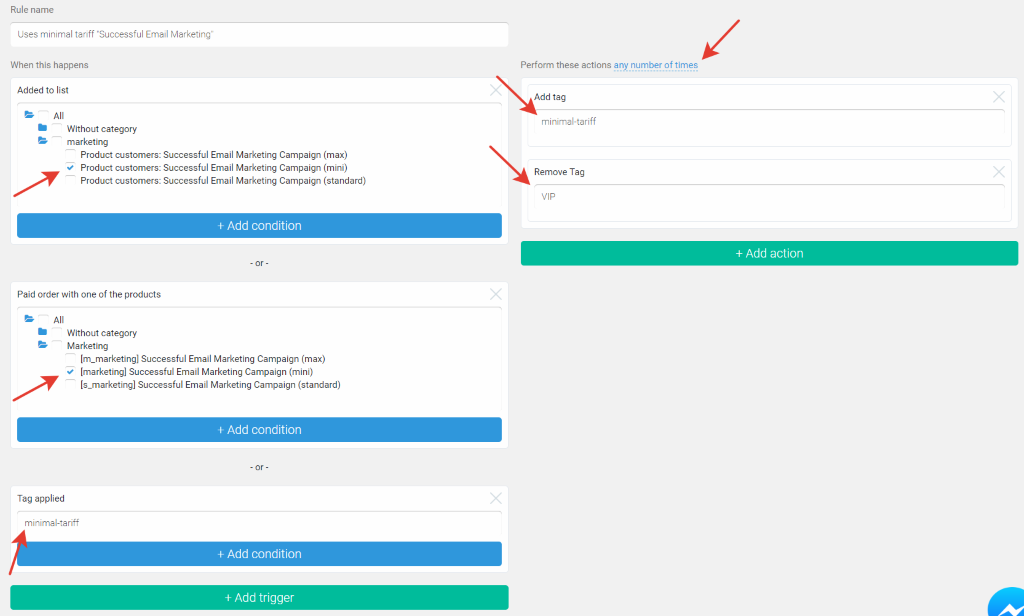
You sell a product in different packages (mini, standard, max). You want to sort out the clients with the mini package and the clients with the standard and maxi packages.
They are sure to be in different groups, but we want to add the appropriate tags. For mini packages, the tag is “minimal-tariff”, for the other two — “VIP”. This requires several rules to create. The first rule presupposes:
- to add “minimal-tariff” tag
- to delete “VIP” tag (in case of its manual add action by you or your manager)
Adjust the settings of the trigger:
- to pay for the mini package order
- to add into the client list (a list from product settings, “Post payment actions“ tab) — in case of manual adding or import
- to add “minimal-tariff” tag — in case of manual adding of a tag by you or your manager
If a client decides to switch from the “mini” to “standard” or “max” package, then you should create a rule when in this case a minimal tariff tag is deleted. The rule will be created in a manner similar to the previous rule:
- to buy a maxi or standard package
- to add to a client list (a list from product settings, Post payment actions tab) — in case of manual adding or import
- to add “VIP” tag — in case of manual adding of a tag by you or your manager
We can set the following actions:
- to add “VIP” tag
- to delete the “minimal-tariff” tag (in case of manual adding by you or your manager)
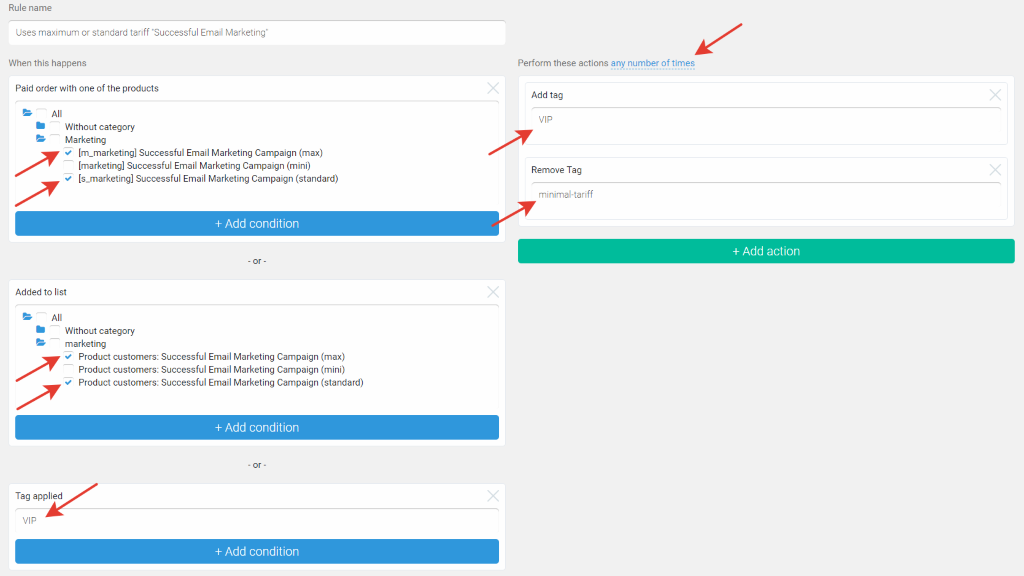
In this case, the rule must be repeated “any number of times”.
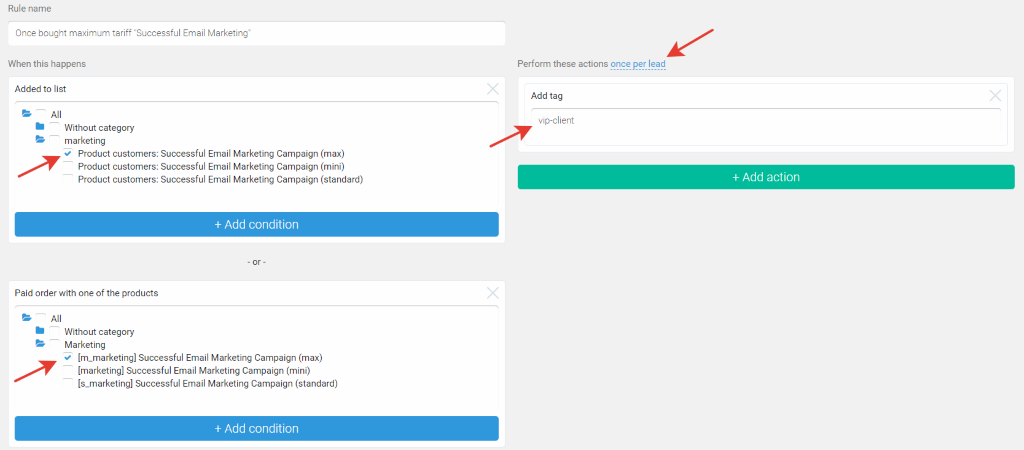
Once per lead
To select the VIP clients who at least once bought the most expensive package, we create the following rule: we set – paid order for the most expensive tariff or subscription into the client list in the trigger, and we set – to add “VIP-client” tag in the action.
Done
When clicking the number of the executed actions, a page with the following information springs up:
- Date and time when the action from the rule is triggered
- First, last, and other names, phone, and email — contact details
- Rule and trigger — the report is generated by the following formula:
Name of the rule — reason for its execution.
The screenshot below shows:
“Super-VIP” rule is triggered by the payment of “Order Number” by “Product” from the client. - Action — what happens with the contact once the trigger works. The screenshot shows the contact was added to the “Super-VIP” test list and was assigned a “VIP” tag.
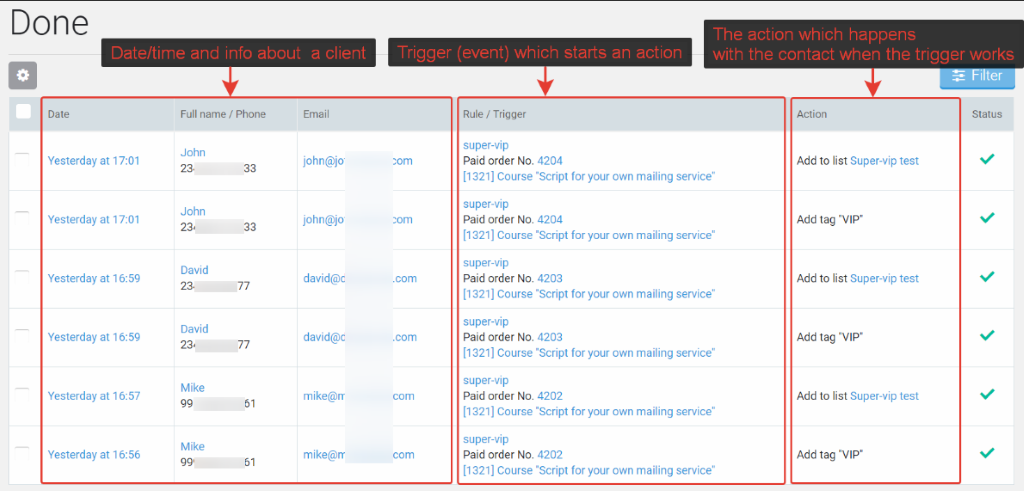
- Status — whether the action is executed for the contact. A green check means the action is executed, while the red check means it is not. The rule is not executed if the action executed earlier (manually or automatically) has been set. The contact was not added to the VIP client group because the contact had already been added to the group before the rule was executed.

Filter
A filter in “Done” section is used to find the action executed for a particular contact. You can also enter the personal data of the contact (last, first names, and other info) and look through the actions already executed. The search settings could be combined.
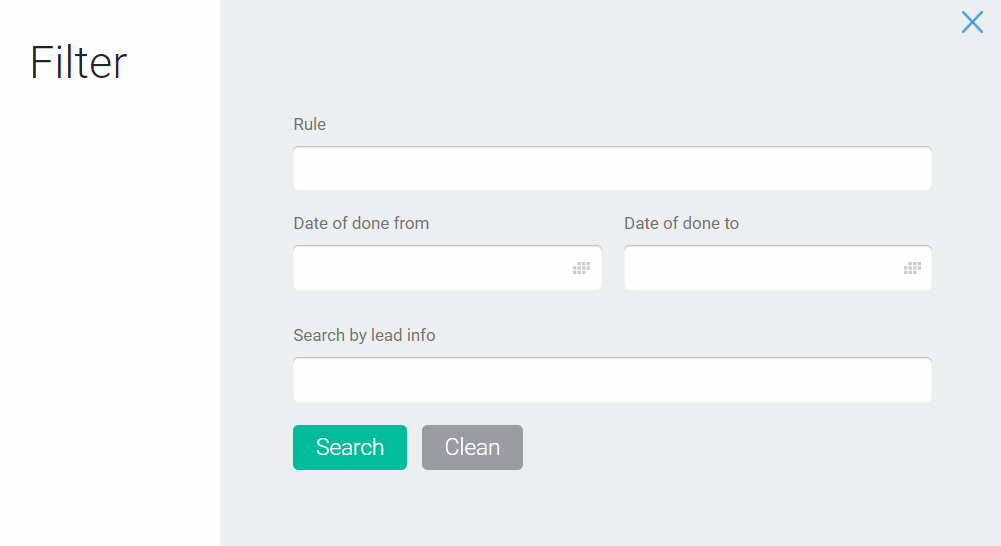
Rule
Rule field is used to select one or several rules. If the field is left empty, then the search will be done through all rules.
Date
“Date of done from” and “Date of done to” — when the dates are specified in the fields, you can set the date period for search. You can fill in one field only if required, while the second field could be left empty.
Search by lead info
This field requires one to enter the last, first, or patronymic names of the client, phone number, or email address. Only one parameter should be entered because the search is not done by all parameters.
Export
To export the contacts with which the action was taken, click the gear and select “Export to CSV” in the menu that opens

Add to group
In contrast to the transfer to the group from the “Contacts” or “Subscribers” section, the transfer from the “Run” section triggers the rules. That is, the rule will work when transferring from this section to the transferred contacts.
How to edit an already created rule?
Click the name of the created rule to switch to an editing mode.

How to disable a rule?
To disable a rule, just move the button against the required rule.
(Green color of the background means the rule is enabled, while the black color means that the rule is disabled).

How to delete a rule?
To delete a rule, click a cross against the required rule. Once the deletion is accepted, the rule and its information will be deleted.

Warning! Deleted rules and their information are not restored.
Articles:
Creating and Editing Processes
Comments
0 comments
Article is closed for comments.