/Store / Functions / How to create or edit a discount
Content [Hide]
Discount types and kinds
Types: In dollars and in percentage

The discounts can be created in dollars (for a fixed sum) and in percentage (for a relative sum, i.e. a particular percentage off the product price). The discount settings differ in one symbol: $ or % in the field “Amount and Validity.”
The discount is created in dollars by default. To switch to percentage, click the dollar icon and select the percentage icon in the drop-down list.

Kinds: For a particular product or for several products
You can start creating a discount in two ways:
- From Store — Discounts, then select the required type of the discount.
This is used to select several products (or all products) which will be covered by the discount.

- From Store — Products, then click the discount box.
For this discount kind, the field with a product choice will be hidden — the discount will cover the product whose box has been clicked. If there is a need to edit it later, then follow the first method.

General settings
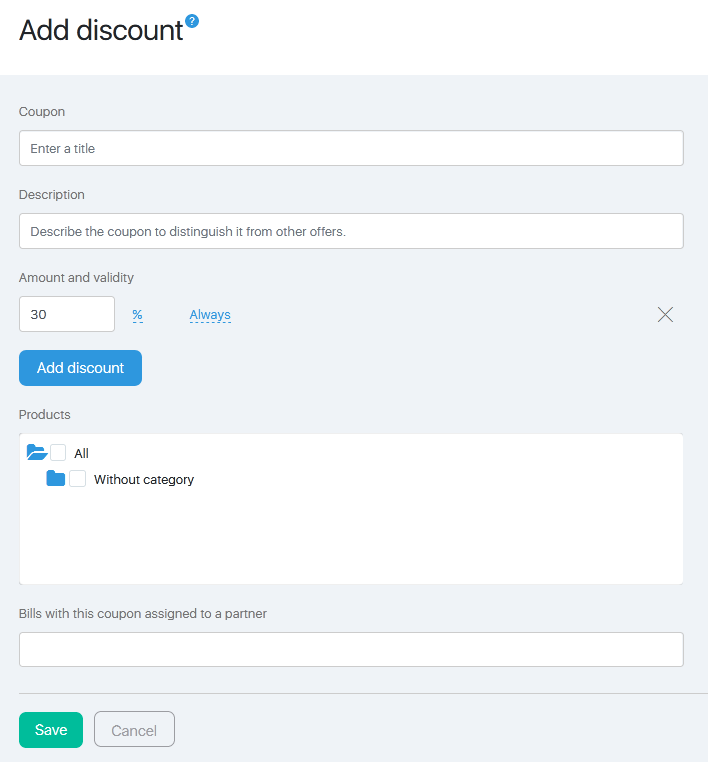
Adding a discount from the page.

To create a discount, fill in several fields. You can also edit the fields.
Coupon field. Enter the discount code here. This code should be entered by a customer when filing an order. There is also an option to give a link for filing an order with an embedded coupon. Then the code in this field will appear in the URL bar and will be displayed in the respective field on the order page.
Description field provides comments about the discount. It is displayed in your personal account only.
Amount and Validity Period field displays the numerical value of the discount. Dollar or percentage — it depends on the discount type you are creating. This will display the validity period as well.

The discount sum is the first field, the dollar icon is the second field. If you would like to change this to a percentage instead, click the icon to select percentage. The validity period is the third field. Here, you can select the validity dates for the discount.
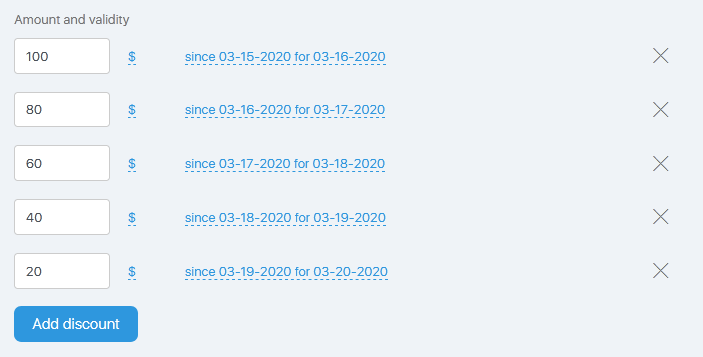
The Add a discount button combined with Validity Period gives a “melting” discount which decreases daily, as seen on the screenshot. In the example above, the discount decreases by $20 daily from the 15th to the 20th. The sooner a client buys, the higher discount he/she will get.
The discount is easy to configure. However, if a discount includes a partner (see below), and the invoice is generated for a subscription product, then the InfluencerSoft system will consider different options. The discount validity period will not be affected, although if you have already used the above-mentioned combination, then it would be of help to read the end of this article.
The Products field enables you to select one or several products for the discount.
Click the blue folders to move around the categories. Select a product by clicking the checkbox and a blue checkmark should appear. To select all products in the category, click the checkbox of the category.
Once all discount parameters are entered, click the Save button. The discount will be added to the overall discount list and to the discount list for the checked product.
Please note! The discounts do not cover products with a “melting” discount.
Discount Partner
Attaching invoices with this coupon to the partner field can attach the partner login to the coupon, therefore the invoices generated with this discount code will be attached to the partner.
How to set this option?
Enter the partner login or copy and paste it. You can also use a pop-up Infobip. To do this, enter the login (number 1 on the screenshot below) and then select it from the drop-down list (2). You can attach the registered partner only.

How it works
The system considers the coupon attachment as a priority. The partner in the invoice will always be looked upon as the coupon during its validity period.
When the coupon validity period expires, then the partnership program works as usual: it considers the first and the last clicks of a lead and adds the partnership commission fees determined in the settings. This refers to any lead invoices, although this can be clearly illustrated by the recurring products (invoices for the subscription products). We will look at some examples at the end of the article.
If you have an invoice with a partner in the coupon, a lead card adds a click. See the detailed information about the clicks here. The click order is critical when the coupon validity period expires.
The case could be that a customer generates an invoice by following a link of one partner, while the discount coupon displays another partner. What is more, the order (subscription) form may have embedded tags as well. How will InfluencerSoft prioritize them?
The order is as follows:
- UTM-tag (ad and partner) in a page link — the first click.
- Tags in the form settings — the second click.
- A partner in the discount coupon — the final click.
Why should we use such a complicated language instead of providing you with the simple and user-friendly cases? The point is that the partnership program is a complicated tool and can be configured in different ways. Therefore, the outcome will be different. The article about the partnership program describes simple and user-friendly cases.
Articles:
The manager handles the order and for the client. What is the difference?
Add and edit a series of payment reminders via email
Comments
0 comments
Please sign in to leave a comment.