| Content |
Social media is an essential resource for today’s online business. It is now possible to automate interactions with your current and potential subscribers and customers thanks to Facebook integration and a convenient chatbot.
Note that the Facebook ad account has a huge set of targeting parameters. This helps to attract the most targeted subscribers to your base, and the cost per subscriber can be lower than from other traffic sources.
By connecting the integration, you will be able to receive Facebook user’s data into your InfluencerSoft contact database (with the subsequent use of this data in all service tools), as well as respond to subscribers automatically via a chatbot in the social network messenger.
Connect Facebook to your account
To connect Facebook to your account, go to your campaign settings, click on Messenger integration and click on the “Continue with Facebook” button:
In the window that opens, you need to either confirm your account (if you are already logged into the Facebook account you will like to be connected to in your current browser), or log into another Facebook account by specifying the login/password from your account on the social network:

Select the pages that Facebook users will interact with, for which the integration is configured (if they do not exist, create a page or group in your Facebook account):

On the options page, enable all options and click on the “Done” button:

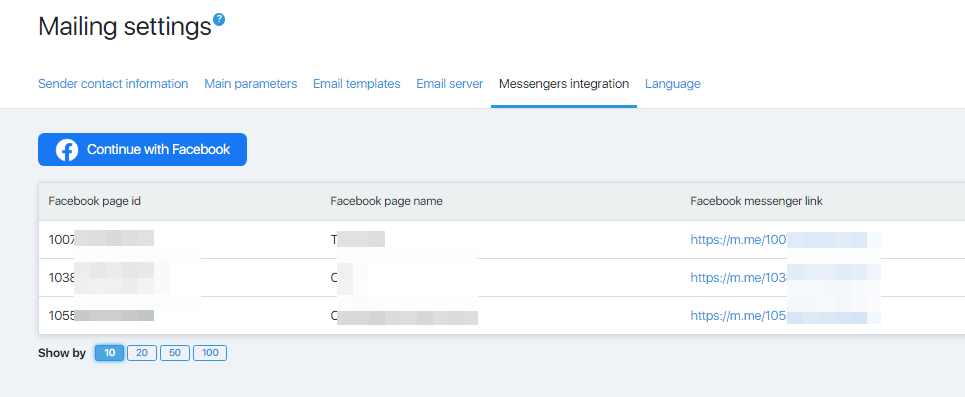
After successful integration, you will see page data from Facebook:
Facebook integration tools
All subsequent settings for interaction with Facebook users are done through processes.
Create a process with Facebook chatbot features
Create a process in the “Tasks” section (for more details about creating processes in this article) or directly in the funnel (check here for more details). You will be able to send messages to users via the InfluencerSoft chatbot directly to Facebook.
In this case, you have the opportunity to receive a contact email address from a Facebook user. This will allow you to interact with the user not only within the social network, but also send email newsletters.
We recommend using processes in funnels – you can configure additional actions for the user after the process is completed:
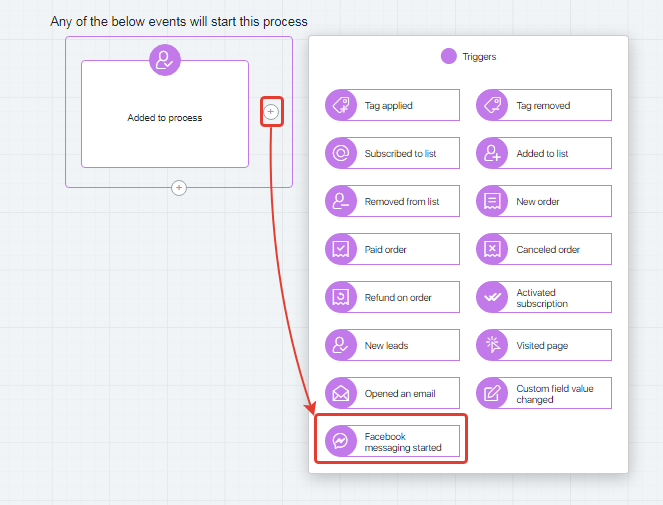
The starting trigger of the process will be the “Start dialogue on Facebook” block:
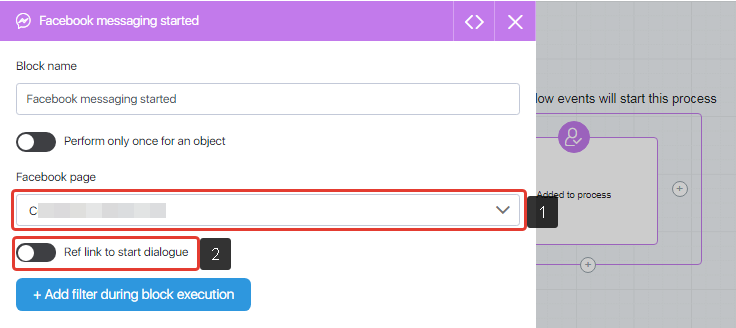
When setting up the block in the field [1], you need to select the page on whose behalf the interaction with the Facebook user will occur (you have already connected it in the Mailings-Settings-Messenger integration section):
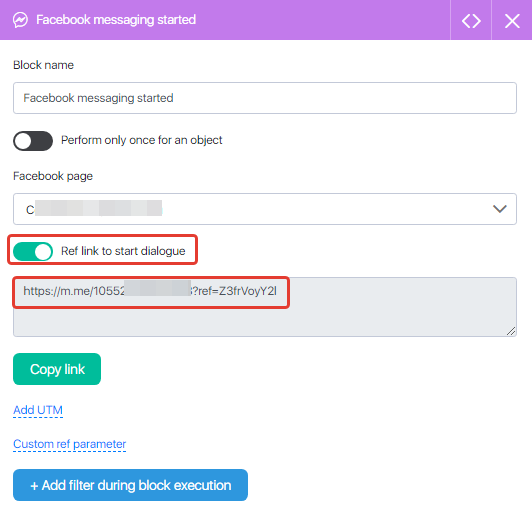
In field [2] you can include a unique ref-link – then the process will be launched only if the Facebook user started the dialogue exactly by the link with the following parameters:
After adding the start trigger, configure other actions that will be performed for the social media user: following Facebook and sending a message in Facebook chat.
Facebook subscription to InfluencerSoft
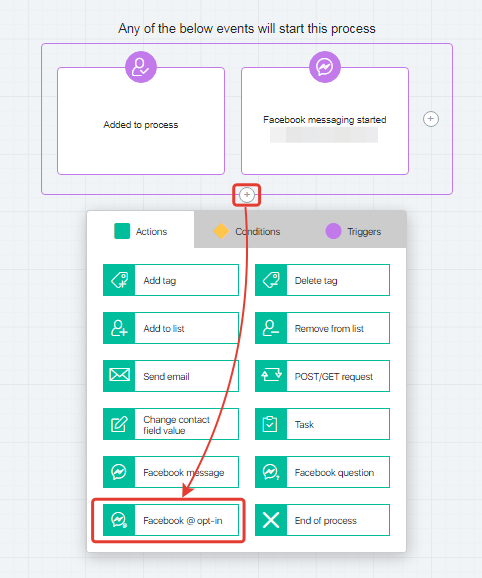
To send an activation email from InfluencerSoft to a Facebook user email, use the “Facebook @opt-in” block in the process:
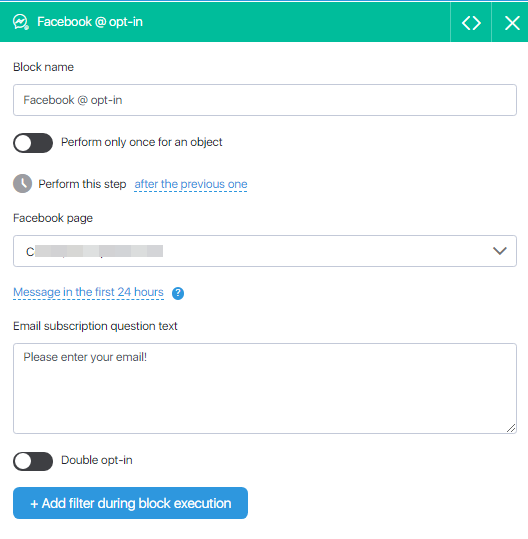
In the block settings, you need to configure the text of the subscription question by email, as well as configure the subscription activation email. Be sure to pay attention to the last field “URL after confirming the subscription” – in it you need to specify a link to the page to which the user will be redirected after clicking on the activation link in the sent email:
After the user enters the process with the “Facebook @opt-in” block, in the chat the user will be asked to subscribe to your mailings in one click, specifying an e-mail (substituted from the Facebook account profile):
After the email is sent via chat, a subscription activation email will be sent to the user’s mail, and the user’s email will be added to your contact database:
After activation, the Facebook user’s contact will become an activated subscriber in your InfluencerSoft account: you will be able to send him emails through the process (as well as broadcasts and automatic email series).
Sending a message to a user on Facebook
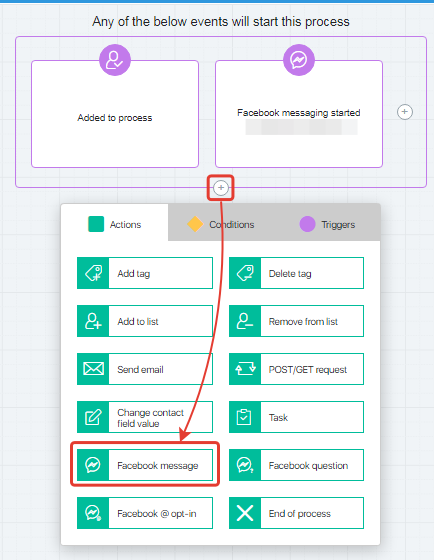
To send a message to the Facebook user who started a conversation on your page within the social network, add the “Facebook Message” block in the process:
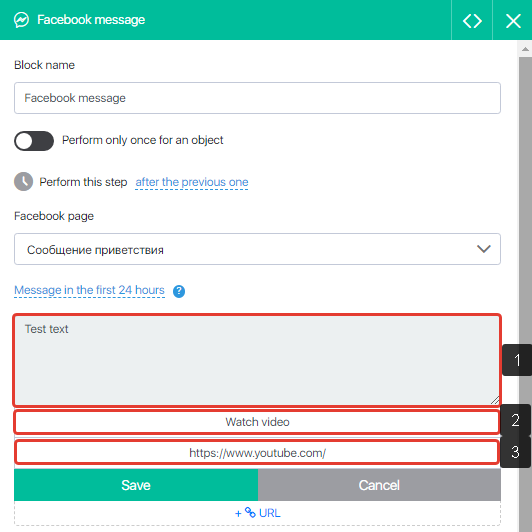
In the message settings, add the message text to the field [1]; the text of the button that will be shown – in the field [2] (if necessary); and the link that the user should follow after clicking on the button – in the field [3]:
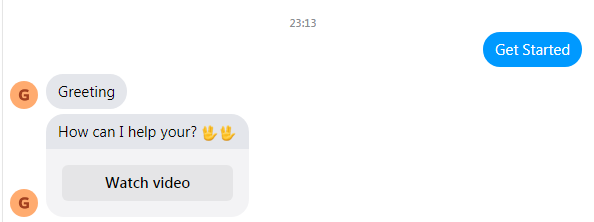
An example of a message from a chatbot for a Facebook user:
You can create additional messages by clicking on the buttons:
- +Text – additional text message.
- +Image – additional message-image.
- +Video – additional video message.
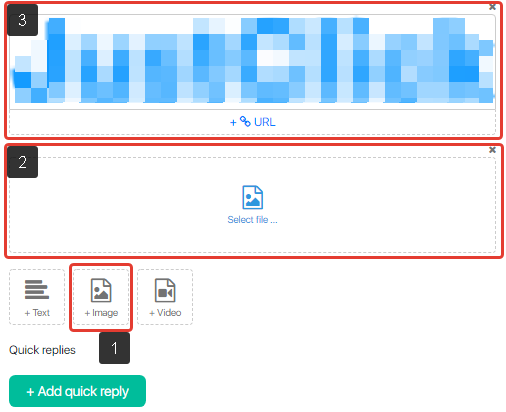
Want to add follow-up messages to the user? It’s simple:
By pressing the button [1] – the format of the additional message will be selected, which will be displayed as field [2]. After adding text, picture or video, it will be displayed in field [3]; you can also add a button with a link below the new post if needed.
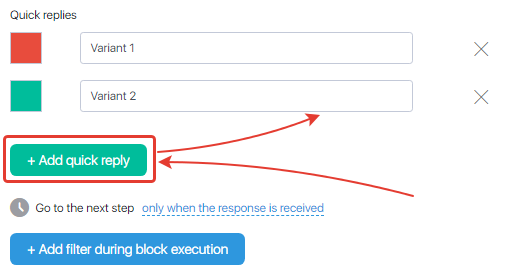
You can add quick replies to the chatbot!
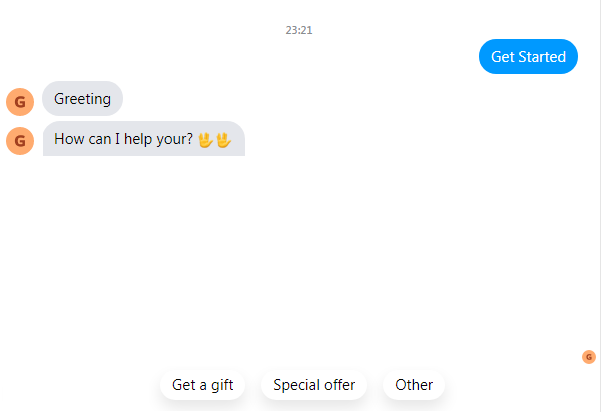
When the user receives your message, the user will be shown one or more options for a quick response to your message. The InfluencerSoft chatbot recognizes the answer options and performs actions according to the specified settings:
In the text for messages, you can add emoticons that work in the messenger – they will be shown to the user as if they were added to Facebook.
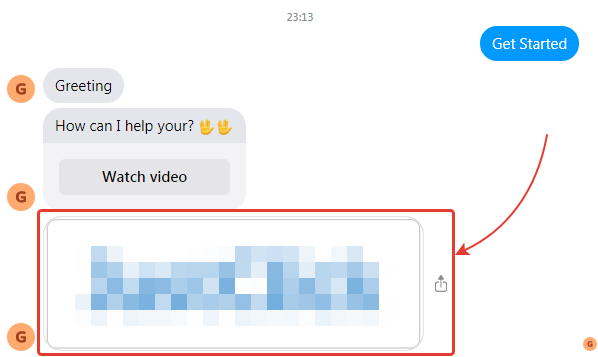
An example of a message with these settings:
You can combine messages, create different process options, and also combine them with the “ Facebook opt-in” block to inform the user more about the benefits of subscribing. For example, offer a gift that you only send by e-mail.
Setting up a sophisticated chatbot for Facebook
You can set up a sophisticated responsive chatbot for your Facebook pages to effectively and most importantly automatically interact with your page visitors.
Let’s take a closer look at the main features of a chat bot:
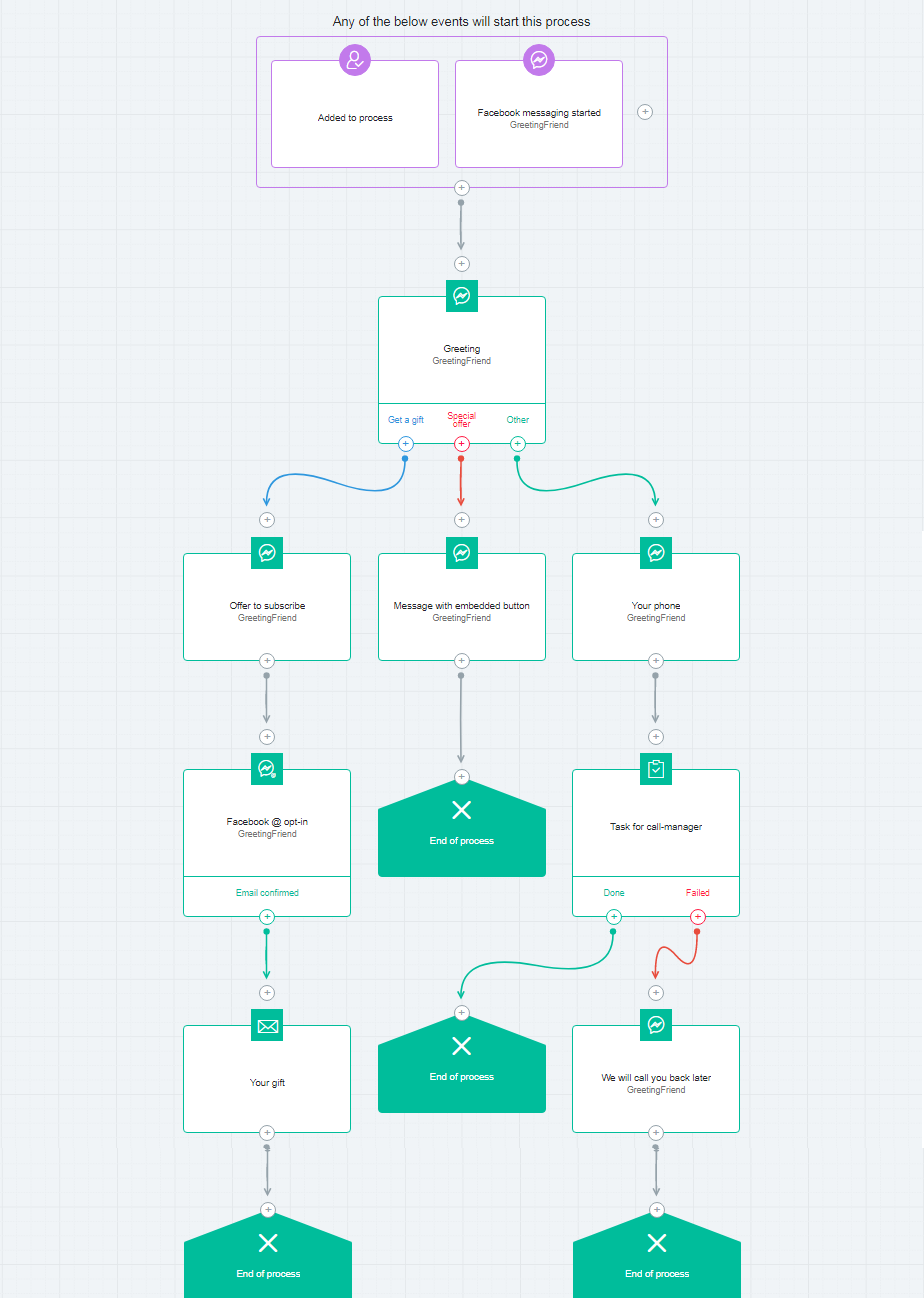
The main advantage of such a chatbot is that all 3 branches will be executed in parallel: the user can select one of the functions and get the result (this will end the process for the user).
After the dialogue on Facebook has started, you can send a welcome message to the visitor of your page, in which the user can choose what they are interested in:
- receive a training course as a gift (left branch of the process);
- offer of a paid course for the promotion (middle branch);
- ask another question, incl. by phone (right branch).
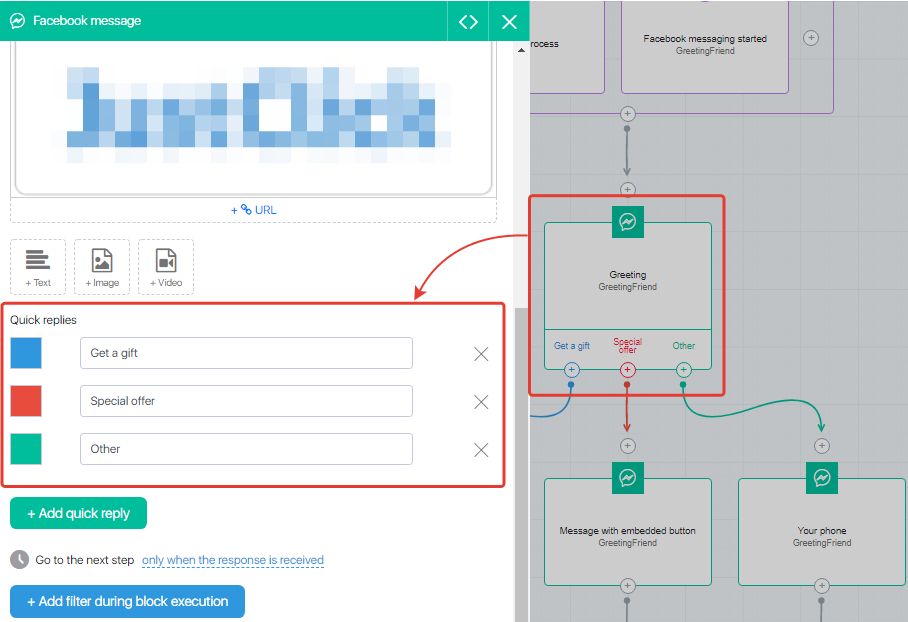
To configure such a block, you need to configure the response options in the “Greetings” block:
After one of these options works, the user will receive a message in the messenger and can choose one of these quick replies. Depending on the user’s response, one of the scenarios will be implemented in the process:
Option “Gift”
After a Facebook user clicks on the “Get a Gift” quick response, the “Subscribe offer” block will work for that user. In this block, you can inform that you are sending a gift only by email, and so that a visitor to your page can receive a gift, they need to send you their email:
Then the next block of the “Subscribe via Facebook” process will ask the user for an email – in the messenger they will just need to click on the email, and the subscription will take place. Then the user activates the subscription on their email – and the last block of the “email with a gift” branch will be executed for the user.
You can add any other actions after this block, or – as in the example – after this block add “End of Process”. This will end the chat with the Facebook user.
Option “Special Offer”
When a Facebook user selects a quick response “Learn about the Special Offer” – the “Message with a button” block is triggered for him/her. In this block, you can describe your proposal to the client in as much detail as possible; clarify that it is limited and available only now (for example), as well as add a button that will link to your sales page (or directly to the order page with a discount):
Clicking on the button (shown with an arrow in the screenshot) will take the user to the link in this button.
Option “Other”
When a Facebook user selects the “Other” quick response, the “Phone Request” block is implemented for that user. Add clarifications for the visitor to this message: what question he/she is interested in; ask the user for a phone number:
The next block can be added to the “Task for the manager to call” block so that your employee receives a notification about the need to contact the client. Then – in the “completed” output, add “end of the process” (because your manager contacted the Facebook user and helped resolve his/her issue), and in the “failed” output, add an additional message for the client that he/she will be contacted in the near future, or an additional nice bonus.
All branches must end with an End Process block.
Expanding the functionality of chat bots
If the user selects one of the options in the chat shown above, other options will not be shown for that user after the end of the branch of the selected option.
You can make it so that the Facebook user within the chat in the messenger can go through all 3 branches of the chatbot, choosing different options for a quick response after the greeting. There are several options for configuring a chatbot for this, but the easiest to configure is the option with recursion of branches.
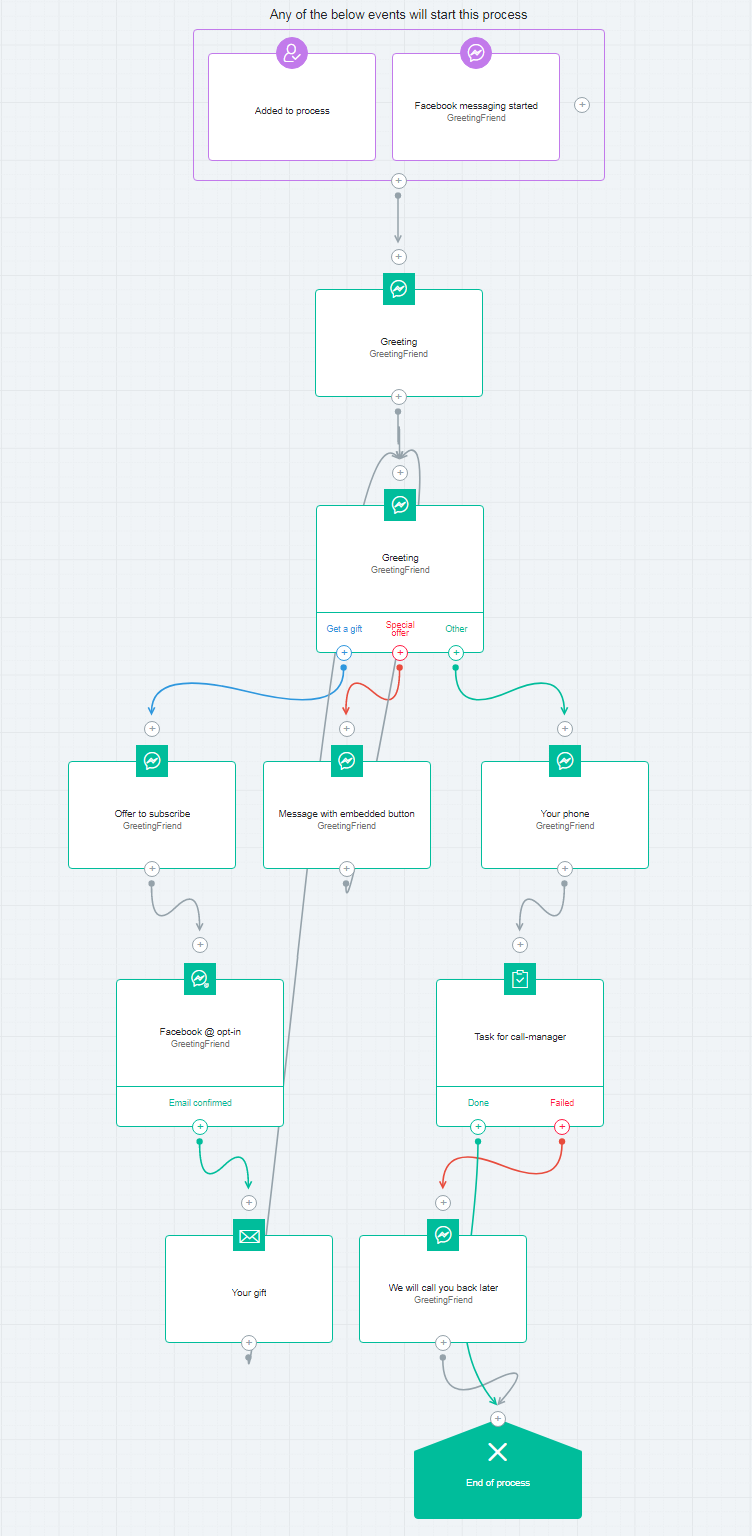
The main feature of this chatbot is that it constantly (or partially) repeats itself, because after executing the branches, the contact in the process returns closer to the beginning of the process, and it will continue to execute for it:
General features of how to best set up a chatbot with recursion:
- The start trigger is “Facebook conversation started”.
- The next block (without delay) – “Facebook message” – a greeting for the user. It shouldn’t be repeated – you don’t need to say hello several times in one chat.
- The next block is the choice of options for the user. This is also a “Facebook message”, but it will be repeated after the end of the chatbot thread.
- The following blocks – come from each of the choices. There you configure the functionality you need, which will be performed for the contact (as in a simple chatbot).
- After you form the entire branch – you need to link the last block of the branch to block 3 – which is placed after the greeting block.
With this, set up the chat bot after the client, for example, receives information on the promotion, a message will be displayed again where he/she can choose the option with a gift or “other”:
On the “other” option, we recommend adding the “End of process” block with a delay, so that after telephone conversations or chatting, the user will automatically end the process (and the funnel actions will start for him).







Comments
0 comments
Article is closed for comments.